Strategy in Dogs in the Vineyard
This is a general guide to strategy in the Dogs in the Vineyard
game. It is not normally thought of as a strategic game, but many
people do play it striving hard within the rules to succeed at
conflicts and advance. Thus, it makes some sense to discuss strategy
implications of the rules.
Character Creation
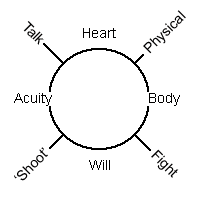
The five character creation options are outlined below -- shown as how
much benefit is given over the base of 13d6 Stat Dice, 2d6 Trait Dice,
and 2d6+2d8 Relationship Dice. The diagram on the left illustrates
how each stat is used in the game. Note that it is possible to assign
ratings to the four activities instead (Talk / Physical / Fight /
Shoot), and work backwards to the four stat values which will give
that. Just double your stat dice and put how much you want in each of
the four areas. Then you can derive the four values. Remember that
Body is the single most important stat, because it directly controls
your chance of dying if wounded. Unless you don't mind dying, you
should put at least 4d6 in it.
|
| Option |
Stat Dice |
Trait Dice |
Relationship Dice |
| Base |
13d6 |
2d6 |
2d6 2d8 |
| Well-Rounded |
+4d6 |
+1d4 +2d6 +2d8 |
+2d6 |
| Strong History |
- |
+1d6 +4d8 +2d10 |
+1d4 +1d6 |
| Complicated History |
+2d6 |
+4d4 +2d10 |
+3d6 |
| Strong Community |
- |
+1d4 +1d6 +2d8 |
+2d6 +2d8 +3d10 |
| Complicated Community |
+2d6 |
+4d6 +2d8 |
+4d4 +2d10 |
|
As for which option to pick, it is a stylistic choice. In general, Relationship dice are much harder to bring into a conflict than Trait dice. In particular, pre-allocated Relationship dice are what is known as "Mother May I" traits. They are flags for the GM to include those NPCs, but there is nothing you can do as a player to ensure that the NPCs appear in the adventure. Note that the trade-off of the Community option gives you slightly more Relationship dice in the two Community options. This may or may not be enough to offset the sheer dice utility, depending on your view.
Trait picking is similarly an art. If you want to succeed, you should pick traits which are easily drawn into conflicts. However, what can be drawn in is a subjective decision that depends on your group. Picking very broad traits like "Lucky" or "Trickier than a coyote" or "Fast worker" are sometimes frowned on, and you should try to be sensitive to that.
Character creation is also a good time to review what house rules, conventions, or clarifications there are to the game. For example, the basic rules are that when you Raise, you say what your character does and put forward two of your dice. Some groups, though, let you state almost anything as a raise -- thus you can have NPCs do things, or narrate your Relationship characters appearing to help you, and so forth. Obviously such changes will affect what is best in character creation.
Conflict Setup
There are two purely subjective parts of the Dogs resolution system: stakes setting, and judging which Belonging and Traits can be added into a given conflict. These have to be handled delicately. You should push firmly to get what you want, but you need to respect others and compromise. If you are trying to succeed, you should push for as major a stakes as you can in negotiation before the conflict -- and also try to draw in as many Traits and Belongings as you can during the conflict. If you really want something, try to get it as part of freeform play rather than putting it in doubt as Stakes in a conflict.
Another point is remember to always try to outnumber your opponents. Dogs are vastly more effective as a group. If you can take opponents on one at a time by a group of Dogs, you are almost certain to win. However, the numbers going in is also part of freeform play, and you should always negotiate or move into conflict if there is doubt or resistance.
Finally, remember to start conflicts to your advantage. In particular, start social conflicts to get what you want. Not only are social conflicts the best path to experience via fallout, but by starting conflicts at appropriate times you can gain advantage for later conflicts.
Conflict Resolution
As far as winning the stakes goes, the single most important factor is Reversing the Blow. Never allow your blows to be reversed, and try to maximize your chance of getting a reversal. The two key points would be: (1) when you Raise, don't allow your opponent to Reverse the Blow; and (2) when you See, don't use higher dice than you have to, thus saving dice for later raises or reversals. Escalation is also important. Remember that there is no need to wait until you are out of dice to escalate -- it is often very useful to not have to go through your low rolls early.
There is one vital aspect to Escalation in particular that often gets missed. Escalation does not have to follow the sequence of talking to physical to hand-to-hand to gun-fighting. If you start with a gun-fight, you can "escalate" from guns to hand-to-hand. This will, of course, change what type of dice that your opponent will take in Fallout -- but only for that particular Raise. Remember that the type of dice you are rolling always depends on what was done on the Raise. You can escalate from gun-fighting to talking on one Raise, and then go back to shooting for your next Raise. If you start with gunfighting, there is no real drawback to escalating down in this way. (See The Forge: Sep 12, 2005.)
Group conflicts can be very non-intuitive, in particular lending dice as helping. It takes a bit of practice to understand. Note that if you are lent one die as help, then if you can match the Raise with one of your dice plus the help die, you Reverse the Blow. This can be enormously useful. Let's say we both have two fives. If I lend you a die and you lend me a die, then we each can Reverse the Blow with 10 instead of Seeing with 10. See (The Forge: March 25, 2005). Remember that each round (which consists of several Go's), you can only lend one die and that is subtracted from your next raise.
For example, suppose you are three players ganged up against a single opponent. Assuming you are united, then during each round your side will have a total of three Sees (on the opponent's Go) and three Raises. Assuming you Block with each See, this would be a total of 12 dice. Among these six, you can lend a total of three times. For winning the stakes, the most effective would be if you can lend during the Sees to Reverse the Blow. Then you can make it through the round using up only 9 dice instead of 12. On the other hand, lending for an ally's Raise can force much greater fallout on your opponent.
Ceremony is useful primarily in that it allows you to interact with things that you otherwise couldn't interact with. More specifically, it allows you to Raise against demons and sorcerers when social or physical action is not appropriate. See (The Forge: Feb 14, 2005).
Fallout and Experience
All character development happens through Fallout. It's important to remember this. Some players often forget and try to avoid all fallout, when really you want to take fallout to improve. Dogs is a peculiar game in that its damage (i.e. Long-Term Fallout) isn't necessarily bad. Taking the +1d4 options doesn't even put you at greater risk of injury or death -- it simply adds to the temptation to risk actual death in return for success. Still, the +1d4 you can get from Long-term Fallout pale compared to the +1d10 you can get from an Experience Fallout. As outlined in the fallout probability tables, if you want to maximize experience gains, then d4 (i.e. social) fallout is the best.
So d4 fallout is almost always a good thing in general. However, it cannot be completely ignored. If you become injured, then d4 fallout is added to the dice which you must defeat in a healing conflict. So if you take d4 fallout, then remember that it adds to the risk of later, injury-potential fallout.
Appendix: Rules Corrections/Clarifications
The following appeared on the Lumpley Games board on The Forge. There was one correction of the text, and two changes for the second edition.
|
Reversing the Blow
When Reversing the Blow, keep the die for whatever your next action is. If you have to See twice (or more) in a row, then keep the die for your next See. (See The Forge: May 2, 2005.)
|
|
(The following is a change in the second edition. See The Forge: July 19, 2005.)
Giving
When you Give instead of Seeing, you don't need to Take the Blow. In fact, one of the best reasons to Give is to avoid a Blow you can't bear to Take.
There's no need to stay in a conflict to the bitter end. You can and should Give as soon as you're willing to let the conflict go -- be it because the stakes aren't worth it, or because you've thought of follow-up stakes even better -- or as soon as you realize you can't win.
When you Give instead of Raising, you get to cut your losses. Grab your highest showing single die and set it aside. If there's any follow-up conflict, roll your Stat and Relationship dice as usual, then add this reserved die to the mix. Don't reroll it! This represents the advantage you keep by ceding the previous stakes on your own terms.
|
|
(The following is a change in the second edition. See The Forge: July 19, 2005.)
Follow-up Conflicts
A follow-up conflict is simply a new conflict that follows on the one just ended. In general you treat it exactly as you would any other, but it does have a few special considerations:
- It counts as a follow-up conflict only if its stakes follow directly from the previous conflict's resolution.
- Its stakes can be the same as the previous conflict's stakes only if all three of its participants, its stage as set, and its opening arena are different. That is, if your character tries to talk my character into admitting her sin, but fails, you can't just try again. That conflict's done. What you have to do if you want a follow-up with the same stakes is come back another time or catch her at some other place, with your friends to back you up -- and this time it can't be just talking.
- If you cut your losses in the previous conflict, Giving instead when it was your turn to Raise, you get to keep your single best die from that conflict. After you roll your dice for this conflict, add your reserved die (without re-rolling it) to the mix.
- As the GM, I get an extra option, and it's a good one. If nobody cares about my NPCs' Fallout, when I roll my Fallout Dice, I don't calculate and choose Fallout. Instead, I simply give you the two highest dice to add into your side of the new conflict. You don't reroll them, just put them straight in with your own dice. They're the advantage you carry into the follow-up.
|
J. Hanju Kim <hanjujkim-at-gmail-dot-com>
Last modified: Sat Aug 5 18:26:44 2006